Hello everybody, hope you are having an amazing day today. Today, we’re going to make a distinctive dish, vickys 'frozen' cake - decoration idea. It is one of my favorites. This time, I’m gonna make it a bit tasty. This is gonna smell and look delicious.
Bolo Frozen Frozen Cake Elsa Frozen Disney Frozen Frozen Movie Fancy Cakes Cute Cakes Pretty Cakes Beautiful Cakes. Take a look at the coolest Eagle cake photos. You'll also find loads of homemade cake ideas and DIY birthday cake inspiration.
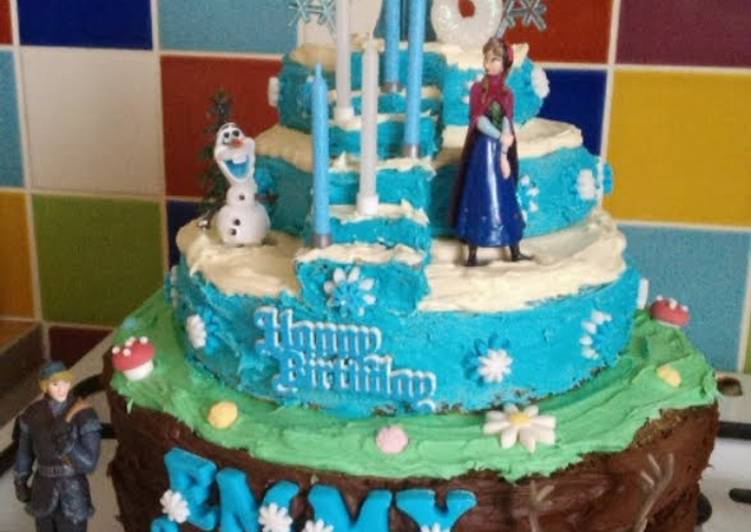
Vickys 'FROZEN' Cake - Decoration Idea is one of the most favored of recent trending foods in the world. It is appreciated by millions daily. It is simple, it’s quick, it tastes yummy. They’re nice and they look fantastic. Vickys 'FROZEN' Cake - Decoration Idea is something which I’ve loved my entire life.
To get started with this particular recipe, we must first prepare a few components. You can cook vickys 'frozen' cake - decoration idea using 9 ingredients and 21 steps. Here is how you cook that.
The ingredients needed to make Vickys 'FROZEN' Cake - Decoration Idea:
- Make ready 2 x 10" round cake layers
- Take 1 x 8" round cake layer
- Prepare 1 x 6" round cake layer
- Take 1 x 4" round cake layer
- Take 1 standard size 9"x5" loaf tin cake
- Take 1 lb chocolate frosting **
- Get 2 lb plain white vanilla frosting, divided *
- Take green gel food colouring
- Make ready blue gel food colouring
Popular items for frozen cake decorations. This Wintery decoration idea can be as simple or advanced as you fancy. A simple and elegant way to decorate your Christmas cake - we've even added our amaretti biscuits for an extra edible treat. The trick to good crystallisation is to lightly paint with egg white and.
Instructions to make Vickys 'FROZEN' Cake - Decoration Idea:
- Level off all your round cake layers. Use a long, serrated knife and use a smooth sawing action to take any bumps or domes off so you have nice flat surfaces to work with. Save the trimmings and use them another day for cake pops - I keep the bag of offcuts in the freezer
- Take a 10" layer and put it cut side down on a cake board
- Coat the top and sides with 3/4 of the chocolate frosting
- Put the cut side of the other 10" layer directly on top and coat only the sides of it with the rest of chocolate frosting
- Take a quarter of the plain white frosting and add some green gel colouring. Mix well and add as much as you want for the shade you like. I like the Wilton gel colours as they don't dilute your frosting and make it runny
- Spread the green frosting over the top to meet the chocolate sides, it's meant to be grass so it doesn't have to be neat or perfect, none of this does!
- Take another quarter of the plain frosting and add blue colouring, again to the shade you like best
- Set the 8" layer on a cake board and go around the sides with the blue. Again it doesn't need to be neat, we're going for a hard icy look here and a choppy finish makes the ice look sharper. I tear squares of parchment paper and wedge them under the cake so once it's frosted you can remove them and the board is still clean.
- Gently lift off the board and centre on top of the 'grassy' cake and spoon some plain white frosting on top. You can patch where you lifted the cake easily with some extra frosting
- Like the 'grass', spread the 'snow' out to meet the 'ice'
- Repeat the same decorating steps for both the 6"and 4" cakes
- Instead of placing these in the centre of the lower layer, place them towards the back of it so you give yourself a larger space at the front to fit in the stairs
- Now take 2 or 3 slices of the loaf tin cake (I cut mine into 10 and froze the other slices for another day) and trim into a neat rectangle. Slice your rectangle into 3 even pieces
- Coat what'll be the outside edges with blue frosting and the top edge with white
- Start to build your stairs from the bottom layer up. Some steps you'll need to overlap and trim to fit. Use your eye to gauge
- Tidy up any gaps between the frosting and stick on any other decoration before the frosting sets
- I used sugarpaste letters for my kids names which a neighbour kindly made for me but you can buy them from any craft baker or online from Ebay. The other flowers etc are also sugarpaste and I bought the figures from a toy shop. This is a basic instruction for making sugarpaste but you also need to let it dry out for a few days before use which isn't mentioned here - - https://cookpad.com/us/recipes/331598-sugar-paste
- This decoration took me 3 hours to finish having baked the cake layers during the week and kept them wrapped in the freezer until the afternoon before decorating where I let them half defrost before levelling, then defrost fully before frosting
- The recipes I used were my chocolate cake for the base (one whole recipe per 10"tin), my banana loaf for both the 8" layer and the loaf tin (one whole recipe per tin) and my vanilla cake for the top 2 small layers (one whole recipe split between the 2 tins) - - https://cookpad.com/us/recipes/333461-vickys-best-ever-chocolate-cake-w-secret-avocado-gf-df-ef-sf-nf - https://cookpad.com/us/recipes/335608-vickys-plain-vanilla-cake-dairy-egg-soy-free - https://cookpad.com/us/recipes/334028-vickys-banana-loaf-gluten-dairy-egg-soy-nut-free
- *For the chocolate frosting I use 175 grams 70% dark chocolate, 250 grams gold foil non-dairy Stork margarine (softened), 275 grams icing sugar and 1 tbsp vanilla extract. Cream the butter and icing sugar together while you melt the chocolate in the microwave. Add the vanilla to the butter then slowly beat in the cooled, melted chocolate
- The plain white frosting recipe I use is 525g icing/powdered sugar, 225g butter (I use non-dairy Gold Foil Stork block brand), a tbsp or so of vanilla extract and a few tbsp coconut milk to loosen it to a spreadable consistency. I kept half for the snow then halved what was left and coloured one part green and the other part blue
Create a "watercolored" cake using gel food coloring and a paintbrush. Forgo edible decorations and make some miniature bunting. yellowblissroad.com. Welcome to our Frozen party page! We have a variety of official Disney's Frozen cake decorations, including snowflake cutters, frosty blue cake boards, a colour spectrum of sugar pastes and colouring's and highly detailed Elsa, Anna, Olaf and Sven figurine cake. Cake decoration is a huge topic.
So that is going to wrap this up with this exceptional food vickys 'frozen' cake - decoration idea recipe. Thanks so much for reading. I’m confident you can make this at home. There is gonna be more interesting food in home recipes coming up. Remember to save this page in your browser, and share it to your family, colleague and friends. Thanks again for reading. Go on get cooking!